• Skip to primary navigation
  • Skip to main content
  • Skip to footer
  • Help Desk
  • My Account

OPA - Oil Painters of America

Dedicated to the preservation of representational art

  • Home
  • About
    • Mission, Policies & Bylaws
    • Board of Directors
    • Presidential History
    • Frequently Asked Questions
    • History
    • OPA Staff
    • Contact Us
  • Membership Services
    • Member Login
    • Membership Information
    • State & Province Distribution For Regionals
    • Update Member Information
    • Membership Directory
    • Contact Membership Department
  • Events
    • Exhibitions
    • Online Showcase
    • Lunch and Learn
    • Virtual Museum Road Trip
    • Paint Outs
  • Resources
    • Brushstrokes Newsletters
    • Ship and Insure Info
    • Lunch & Learn Video Archives
    • Museum Road Trip Video Archives
  • Services
    • Sponsorship Opportunities
    • Scholarships
    • Critique Services
    • Workshops
    • Have A HeART Humanitarian Award
  • Online Store
  • Awardees
  • Blog
    • OPA Guest Bloggers
    • Blogger’s Agreement (PDF)
    • Comment Policy
    • Advertisement Opportunities
  • Show Search
Hide Search

Archives for February 2020

Geeking out on Studio Lights

Dave Santillanes OPA · Feb 24, 2020 · Leave a Comment

Prior to becoming a full-time artist I spent 12 years as a Digital Imaging Technician for a professional photo lab. It explains, at least in part, how I can get excited about things like matching the temperature of my studio lights to the white-point setting of my camera. My day to day job was basically “all things Photoshop” – from scanning, to color management to image editing and pre-press. And I worked with many well-known local artists, like Skip Whitcomb and Richard Schmid. In fact I did all the scanning and color work for Schmid’s books: Alla Prima and The Landscapes. The knowledge I gained during those years has proven invaluable to me as a fine artist. One area of particular benefit has been in setting up a consistent work flow – from studio lighting to photograph-ing my own work and ultimately preparing and perfecting the images for advertising, printing and submitting to shows or magazines. So I thought it would be useful to share some of the things I’ve learned along the way, and I’ll begin at the beginning with studio lighting.

But before going into my own studio lighting setup, it’ll be helpful to touch on a few lighting basics. If you want to skip ahead to my setup I won’t be offended. But for the rest of us geeks here we go.


Source: Medium.com (https://medium.com/@Dropality/matching-lights-color-temperature-to-your-home-8ee80cc79474)

Color Temperature

There’s a lot of technical info on the web about how the temperature of a light source – expressed in Kelvins – corresponds to the hue of the light emitted. If you are interested feel free to investigate this more in your spare time and learn about things like “black body radiators” and “Planckian locus”. But let’s face it, we’re artists not scientists. All we need to know is what color is our light and how will it affect our paintings.

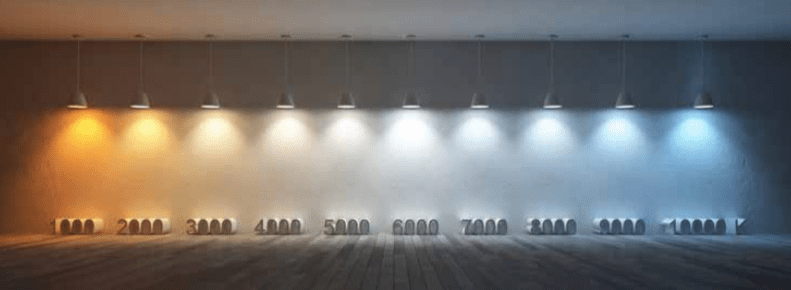
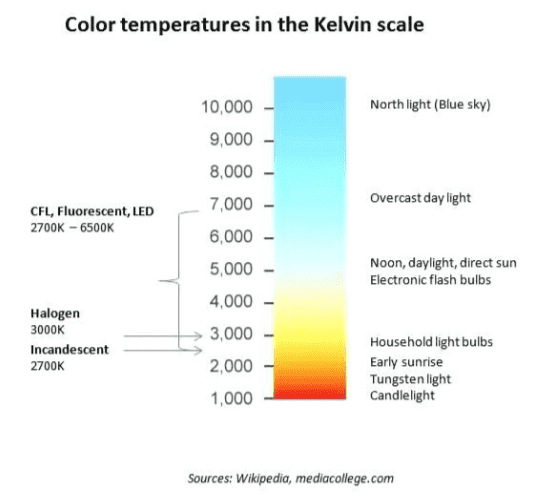
As it applies to artificial light like LEDs we are talking more specifically about Correlated Color Temperature (CCT) which is a visual color approximation of these Kelvin temperature hues. And, as if to confirm that none of these scales were created by artists: the higher the temperature on the Kelvin scale the cooler or “bluer” the light; a paradox that I assure you makes sense to scientists. Temperatures at 5000K and above begin to shift towards Blue and below 5000K towards red. On opposite ends of the scale, Candlelight would be approximately 1000K and North light would be 10,000K.

The ideal light source for accurate color rendering will have a color temperature between 5000K-6500K (natural daylight) and a high CRI value – which we’ll get to next. (Source: https://www.fullspectrumsolutions.com/pages/cri-explained)

Color Rendering Index (CRI)

This is a scale between 0-100 that measures a light’s ability to reveal colors accurately. And it’s not a subjective scale – there’s actual math involved. Basically the higher the number here the better. Sunlight, natural light and incandescent light all have CRI values of 100. For art studios, anything above 95 is ideal. Above 80 is OK. But CRI is only part of the equation. For example incandescent bulbs have a CRI of 100 (since they use thermal radiation to produce light) but their temperature is limited to only around 2700K leaving them deficient in revealing the blue spectrum of color. North Light also has a CRI of 100 but with a color temperature of 10000K it lacks the ability to accurately reveal the yellow/red color spectrum. Daylight which is the basis for all of our color perceptions has a CRI of 100 and a color temperature between 5000K-6500K revealing the most accurate color. (Source: https://www.fullspectrumsolutions.com/pages/cri-explained)

Lumens and Lux

Lumens describes how much light is emitted by a light source and Lux is how much of that light is actually falling on a particular area. Lux should always have a distance associated with it (i.e. 2450 lx @ .5 meters). There’s no perfect amount of Lumens or Lux that I’ve seen expressed in a way that would describe an ideal for every artist in every studio. But some consideration for common tendencies is helpful. For example, if you paint in a studio that is too brightly lit the tendency is to compensate with a very dark or low-key painting. If your paintings look consistently too dark in their final destination, you’ll want to lower the brightness in your studio. You’ll compensate with a lighter painting. Conversely, a dimly lit studio may lead to a high-key painting. From my own experience and research, it seems that 7500 LM is a good number for an average-sized room and depending on distance of this light to your painting this equates to somewhere in the neighborhood of 600-1000 lux on your canvas. Here’s a link to a handy Lux to Lumens calculator: https://www.bannerengineering.com/us/en/company/expert-insights/lux-lumens-calculator.html

My Studio Set-up

My studio is in the unfinished basement of my home with my easel set near a small north light window well. Although north light has a consistent color temperature throughout the day, I’m not a huge fan of the blueness of the light and I’ve found the brightness varies greatly. So even with the small amount coming in the window well I rely mostly on artificial light at the easel. When you’re relying on artificial light or even supplementing natural light it’s very important to find the right artificial lights. Which leads to my current setup. About a year ago I replaced two giant, boat-anchor sized fluorescent lighting units (I’m guessing the CRI was at or below 80), with three small, 8×10-inch, flat panel, LED lights from Viltrox (About $200 on Amazon for 3 lights, including stands and remote controls). They have a high CRI (95+), Color temperature adjustable from 3300K to 5600K and brightness adjustable from 20%-100% (up to 2500 Lumens each).


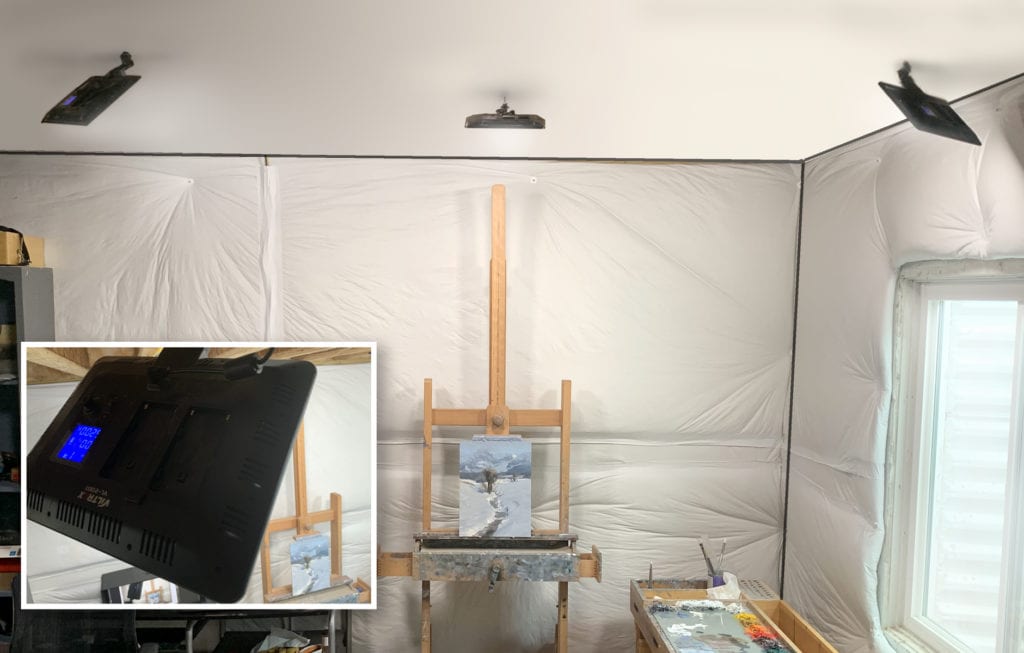
I’ve photoshopped in a ceiling over the framework of my unfinished basement to better show the positioning of my LED lights: 2 at 45-degree angles to my canvas and 1 overhead. The inset shows a closeup of the Viltrox LED light panel.

Although they are intended as mobile, stand lights, I mounted them on the ceiling to free up studio space (2 on either side at 45-degree angles and one overhead) – a luxury afforded by working in an unfinished basement. But if you have a finished studio you’d probably want to consult an electrician to do this as they are not originally designed for that purpose. That said they work perfectly well on the floor too. In fact, I also purchased two slightly larger and brighter panels (400t) that remain on their stands. I use them for doing workshop demos as they are easily portable – In fact they’ll fit in a regular laptop bag. I also purchased some battery packs in case I can’t be near an outlet. In the studio they are great for lighting models and still life setups. And you can control them individually or as a group with the included remote control. For example, I can turn off the light directly over my easel and keep the angled lights on.


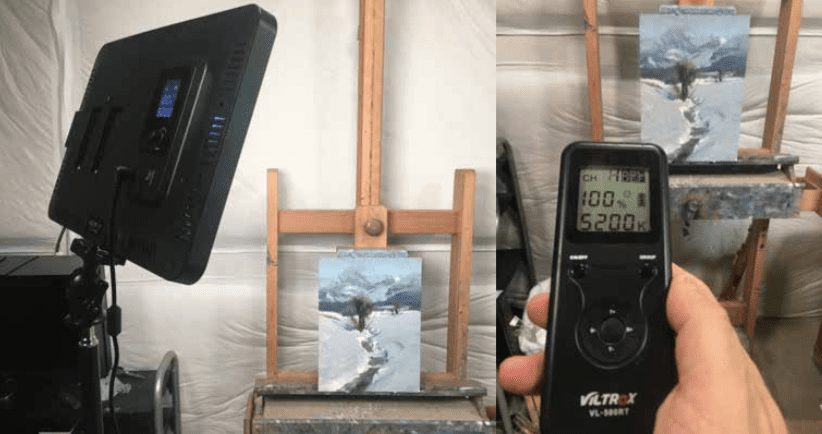
Image on the left shows the larger 400t LED light panel which I use on the stand that comes with it. Image on the right shows the remote control that also comes with these light panels.

By far the biggest advantage with these lights is the ability to adjust both the brightness and color temperature.  With my old florescent and incandescent units the only way to do this was to change the bulb. And with these old units I would always opt for 5000K bulbs since the alternative choices for natural daylight were either too cool (6500K) or too warm (4100K).   Now that I can be more picky I generally set mine to 5200K at 100% (I tend to paint on the cool side and this evens me out a bit).  But, again, figuring out your tendencies is important especially if you are able to adjust color temperature on-the-fly and with precision.  In fact you might be able to paint a nocturne during the day if you set your lights warm enough (you’ll compensate with a nice blue, nocturne-like painting!)  And once you’ve finished a painting and it’s sitting on the easel ready to be photographed, there’s one more very unique advantage to being able to adjust the color temperature of your lights – you can set your camera white-point to “Daylight” (approx. 5200K) and set your studio to 5200K and take perfectly color balanced photos.  But that’s a topic for another day.


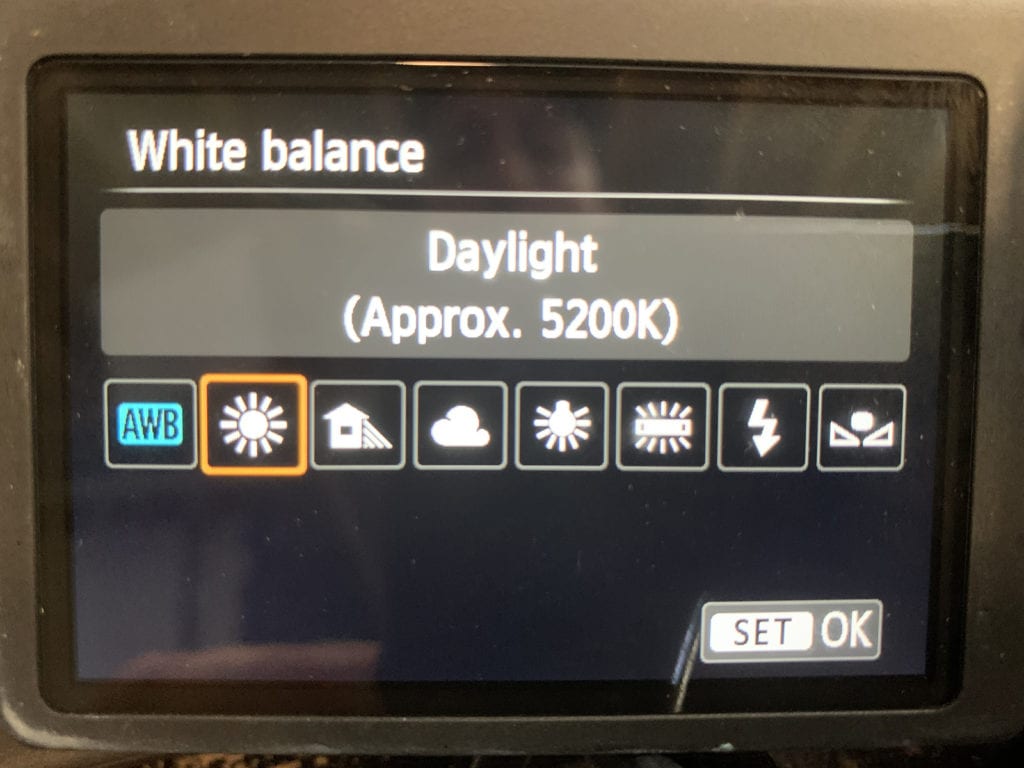
This is the setting I use on my digital camera for shooting my work. I used to set a custom white- point using a gray card (icon on the far right). But there’s no longer a need since I can set my studio color temperature to match my camera setting.

Berthe Morisot and Her Brushwork

Thomas Kitts · Feb 17, 2020 · Leave a Comment

I received an email from my blog a while back asking a couple of questions about how Berthe Morisot painted. I thought my reply might be interesting to a wider readership, so here it is…

On Feb 25, 2019, at 11:36AM, Malcolm wrote: 

Mr. Kitts,

I received your email this morning about the micro and macrocosm of your painting brushwork and enjoyed the video. Very nice surfaces!

This evening I will purchase, and watch, your ‘Sargent’ video and hopefully that video will answer a question that I have about gestural brushwork.

But in case it does not I am also sending you this email to ask: in the attached image of the Berthe Morisot painting the brush work is very loose and superimposed over other brushwork, what medium (if any) would she have mixed with her oils to achieve those flowing strokes? They are fluid and almost translucent in areas.


Dans la salle à manger” by Berthe Morisot

And here was my reply…

Hello Malcom. Thank you for your kind words and email. For the record, the video you referred to is a 2018 demonstration of Sorolla’s methods, not Sargent. But I have just release a 17-hour demonstration of Sargent’s techniques a few weeks ago. So perhaps one or the other, or both, will be of interest to you…

But to return your original question: I have always loved the work of Berthe Morisot and feel her influence has long been underrated as one of the original French Impressionists. But I don’t consider myself an authority on her or her work. However, I do feel I can make a few educated guesses based upon what I know about the materials and methods used by Berthe and her brethren. But before I begin, it is important to appreciate few artists worked in the same way with the same materials over their entire career and I believe Berthe was no different. So what follows should be considered a quick generalization about our two paintings and not a scholarly summary of Morisot’s technique.

First, I have attached a different painting than the one you shared. It was probably painted close to the time of your Morisot. But with mine, you can zoom into the image to see more detail, which reveals a lot about her brush work. And please note, the observations I share refer to my image, not yours…

“The Artist’s Daughter Julie with her Nanny”
by Berthe Morisot

1. In general, Berthe painted on a tightly woven linen support. The ground or ‘primer’ would have likely been a mixture of lead oil and a calcium carbonate, or a chalk to aid in the adhesion of the paint layers. This was a common support used by French Impressionists and it is still a lovely surface to paint on today. So why not try it out yourself? If you like Berthe’s work, the support you paint on will often dictate the character of your brush work. 

2. I would guess her ground was somewhat absorptive and Berthe often stained it with a pigmented earth color such as burnt umber. (see the enlargements found in this post.) A thin wash would have been applied and allowed to dry before a painting was started. I say dry because I do not see any softening or diffusion in the lower layers of the painting. Diffusion would indicate Berthe painted into a wet surface, or a wet imprimatura, and we don’t see that here.

3. The colors she used contributed to the character of her brush work. Berthe used a (largely) opaque pigmented palette that was common to most of the original French Impressionists. (She married Eugène Manet, Édouard’s younger brother, and it was she who convinced Édouard to begin painting outside. She also introduced Édouard to her circle of young Impressionists, who received him as a champion of their cause.)

Berthe’s palette primarily consisted of cadmium yellows and reds, and I’d guess from this painting, prussian and colbalt blue, plus possibly an ultramarine blue, a viridian or emerald green, and a few earth colors such as umber, ochre, and sienna. For an impressionist, Berthe favored more neutral color mixes and she painted with a lead white, and there does not seem to be much use of black since it was considered an anathema to the theories of Impressionism. There may be more colors in this painting but confirming what they are would require some sophisticated lab analysis. For the most part, the lead white dictated the character of Berthe’s strokes. Lead white’s thixotropic properties create this kind of stick, drag, grab, and pull, and it tends to imbue such qualities into any other color it is combined with.

4. Consider how the paint is applied. The surface strongly suggest this painting was executed rapidly with paint being applied thinly at the outset. Later strokes were built up and applied more thickly, with more body, and with each pull retaining its own integrity. You do not find much blending between strokes or colors and there is little to no softening of edges. I don’t find any slumping in the thicker strokes so Berthe probably didn’t incorporate much, if any oil or medium beyond whatever was already in the paint. I don’t know if she, like many of her compatriots, purchased her paint from Sennelier in Paris. But if so, her colors would have been ground in safflower, not linseed oil, which behaves differently under the pressure of a brush. Applying paint straight from the tube with minimal alteration was a common practice among the French Impressionists because they valued expediency when painting from life, and color intensity above all else. Thus they did not like to overmix their color. They also preferred their finished work to have a matte surface because they felt glossy surfaces and pre-mixed color diminished the optical (partitive) effects they pursued over all else. Berthe often left small flecks of pure color in her strokes to excite the eye, with the flecks at times being analogous to the base hue, and sometimes the flecks being a complement or near-complementary hue. So as a card-carrying inside member of the French Impressionists, Berthe was likely to have been working straight from the tube, wet-into-wet, and pushing color into, or on top of color. If you look closely at the child’s lacy collar you will find Berthe ‘double-loading’ her brush – where she picks up two colors before she dragged the hair across the canvas – an entirely new and exciting way to paint that became central to the Impressionists’ aesthetic. 

5. In addition, from the marks we see, Berthe preferred using a stiff brush. Likely consisting of hog hair; and even more likely, a combination of short flats with worn down or flayed hair. (So failing to clean your brushes may have an up-side, yes? Ha!) You can see traces of her distressed brushes pressed into the thicker striated impasto strokes. She also applied flicks and touches of color with a round brush on occasion, reserving them for fine details such as the eyes and eyebrows. But please note: Berthe doesn’t use a small round to paint a large shape, nor does she render ’detail’ with a lot of repetitive strokes. Big areas are indicated with expressive gutsy pulls with a fully loaded brush. 

6. And finally, look at the directionality of her strokes. What you and I would call the gesture of the mark. She often pulled her strokes in alignment of a shape. Yet she also turned the direction of her strokes to follow the shifting surface planes to imply a sense of form. (Look at the shoulders of both figures.) Other times she pulled her strokes flatly aligned with the picture plane. (Look at the cheek of the nanny’s face.) Sometimes, some of Berthe’s strokes are short and appear to be laid down randomly, a technique reserved for areas of lesser importance. Sometime her strokes start off going in one direction but then arbitrarily whip around in another. All of this activity contributes to the energy you feel when you look at her work. Her unique brushwork is a crazy, layered, mark-making technique, yet her subjects and narrative still hold together. Why? (hint: Value Relationships…) French Impressionists used such loose and expressive brushwork to convey a sense of light, movement, vibrancy, and a  joie de vivre– with Berthe being one of the more wilder members of the club. In fact, in my opinion, Berthe was farther out there on the edge than all of her better-known male counterparts and yes, she deserves far more credit for being there.

So based on this painting and the others I spent time in front of in the Musée Marmottan Monet in Paris last August, I don’t think Berthe used much medium at all, beyond the possibility of a little solvent at the start with the one possible exception being the isolated blue scribbles which define the nanny’s left wrist cuff. That blue paint looks as though it was thinned down with a solvent and added after the fact on top of dry paint. A corrective move, perhaps.

And in your opinion would that painting be completed in one sitting or over many days? 

This painting was probably largely completed alla prima, or within a single session. A few passages may have been re-worked or re-touched during a second pass. But given the way the surface looks, any revisions would have been minimal. There is no sign Berthe was working into what the Parisian Academics called a ‘couch’ – meaning, painting into an ‘oiled out’ area with fresh paint – which is how many artists in the late 19th century often made their multi-session paintings look like they were one-shot wonders.

Malcom, I hope you found this information helpful as you continue your studies. Be sure to keep looking at as many originals as you can find but don’t forget to paint from life as well. Why? Well, here is a quote to remember:

“Real painters understand with a brush in their hand…”

   –   Berthe Morisot

“Self Portrait” by Berthe Morisot

Technical Insights from "Weekend with the Masters"

Daniel Gerhartz OPAM · Feb 10, 2020 · Leave a Comment

Today’s blog is from OPA Master, Dan Gerhartz, with some insights he shared during the 2012 “Weekend with the Masters”. Though it is a few years old, the information is timeless.

Portrait Demonstrations… Weekend with the Masters

“Chelsea” by Daniel Gerhartz OPAM

I have had the privilege of teaching the art of painting for the last twenty years or so and have chosen the portrait as the vehicle to explain the concepts because of the exacting nature of the subject, forcing the student to be precise in their seeing and drawing.

What remains my greatest challenge in the process of teaching is conveying in the simplest of terms the most direct, systematic approach to solving the problems before us.  As we stand with loaded brush before the model, so many decisions need to be made at once, often instilling panic in our hearts while we try to sort out the visual information.  Organization of thought in the beginning is paramount in the process and seems to be the only way to wade through the ordeal with any peace of mind and success in the endeavor.

“Yes, yes”, you may be saying, “but organize what?”

It has been my goal to stress the critical nature of categorizing the aspects of drawing, value, edge, and color from the outset so as to build on a solid foundation.

This needs to be accomplished before I apply paint to the canvas so I can break down the elements in a way I can wrap my head around and not be overwhelmed as the avalanche of information pours in.  So, before I begin to paint, I will make these visual observations and mentally categorize them in terms of hierarchy of value, edge, color, etc…

“Scarlet and Gold” by Daniel Gerhartz OPAM

Value…  Look to see while squinting where the lightest lights and darkest darks are and then make a concerted effort to keep all other values in their proper range compared to the extremes.  i.e.(Not allowing the reflected lights to become too strong so to break out of the simple shadow shape or applying too many highlights to destroy the subtlety of tone.)

Edge…   When squinting, what edges emerge as the sharpest and which visually subdue to create the most variety to add power and drama to the subject.

Color… Where are the strongest colors and how do all of the others relate to them.  Also, what is the color of the light and do I see its influence on all of the top planes of the scene.

If I take a few minutes before the work begins, often it alleviates some stress and possible mistakes along the way… Keep Smiling!

These two works were completed as Demonstrations at a conference in San Diego.

www.danielgerhartz.com

Painting Backgrounds

William Schneider · Feb 3, 2020 · Leave a Comment

I have received a number of questions about painting “backgrounds” specifically for portraits. Too many students spend their time rendering the subject and then try to paint the background at the last moment. The result is often a disaster; the figure looks pasted on or there is a formless envelope around the head. The problem is that the background is an afterthought rather than an integral part of the painting. 

Don’t forget, someone looking at the painting sees the whole…not just the subject. In reality, the background is vitally important because it defines the center of interest. My pastel mentor, Harley Brown, told me “always work the background at the same time as the subject”. The key is to give some thought to what you’re doing and why. Here’s a great quote from Quang Ho: “If you make a decision, it’s always right!” Think about it! 


I think of three elements and three approaches when I make decisions about the background: 

Elements:
  1. Value – is the background darker (like a typical Rembrandt portrait), lighter  (like a more contemporary graphic piece) or the same value (used by some artists to lose the edges on the light side of the face).

  2. Hue – A background that is the complement of the dominant color of your subject (either grayed or high-Chroma) automatically defines the subject as the center of interest. Furthermore, if you place equal amounts of the discords (two steps on either side of the subject’s hue on the Munsell color wheel) near the subject you reinforce the effect.

  3. Shape – Rather than have a flat tone around the portrait (boring) you can create secondary points of interest…the three approaches listed below. 
Approaches:
  1. A specific scene or environment. Sargent did this in almost every portrait. He used columns, chairs and vases as secondary points of interest to create a mood.

  2. A suggested environment. Abstract shapes still place the subject somewhere other than empty space. 

  3. A vignette– although the picture plane is not completely filled, the shapes that are there fulfill a design purpose. (I was taught that it’s a good idea to have a vignette touch three sides of the picture plane. I often design the “background” to have a movement that opposes the thrust of the figure.)

Here are some examples of all three approaches. By the way, I cover this (plus a lot more) in my workshops and DVD on Design / Composition Secrets of the Masters. 

 “Circe’s Potion” by William Schneider OPAM – Oil
“Kelly by Moonlight” by William Schneider OPAM – Pastel
“Persecuted” by William Schneider OPAM – Pastel

Footer

  • Home
  • About
    • Mission, Policies & Bylaws
    • Board of Directors
    • Presidential History
    • Frequently Asked Questions
    • History
    • OPA Staff
    • Contact Us
  • Membership Services
    • Member Login
    • Membership Information
    • State & Province Distribution For Regionals
    • Update Member Information
    • Membership Directory
    • Contact Membership Department
  • Events
    • Exhibitions
    • Online Showcase
    • Lunch and Learn
    • Virtual Museum Road Trip
    • Paint Outs
  • Resources
    • Brushstrokes Newsletters
    • Ship and Insure Info
    • Lunch & Learn Video Archives
    • Museum Road Trip Video Archives
  • Services
    • Sponsorship Opportunities
    • Scholarships
    • Critique Services
    • Workshops
    • Have A HeART Humanitarian Award
  • Online Store
  • Awardees
  • Blog
    • OPA Guest Bloggers
    • Blogger’s Agreement (PDF)
    • Comment Policy
    • Advertisement Opportunities

© 2025 OPA - Oil Painters of America · Design by Steck Insights Web Design Logo