• Skip to primary navigation
  • Skip to main content
  • Skip to footer
  • Help Desk
  • My Account

OPA - Oil Painters of America

Dedicated to the preservation of representational art

  • Home
  • About
    • Mission, Policies & Bylaws
    • Board of Directors
    • Presidential History
    • Frequently Asked Questions
    • History
    • OPA Staff
    • Contact Us
  • Membership Services
    • Member Login
    • Membership Information
    • State & Province Distribution For Regionals
    • Update Member Information
    • Membership Directory
    • Contact Membership Department
  • Events
    • Exhibitions
    • Online Showcase
    • Lunch and Learn
    • Virtual Museum Road Trip
    • Paint Outs
  • Resources
    • Brushstrokes Newsletters
    • Ship and Insure Info
    • Lunch & Learn Video Archives
    • Museum Road Trip Video Archives
  • Services
    • Sponsorship Opportunities
    • Scholarships
    • Critique Services
    • Workshops
    • Have A HeART Humanitarian Award
  • Online Store
  • Awardees
  • Blog
    • OPA Guest Bloggers
    • Blogger’s Agreement (PDF)
    • Comment Policy
    • Advertisement Opportunities
  • Show Search
Hide Search

Archives for November 2019

Looking for the Unique

Ned Mueller · Nov 25, 2019 · Leave a Comment

“Sunlight and Shadow” by Ned Mueller OPAM

Most of us would like to be creating unique or compelling works of art, or at least something that we can feel quite proud of. However, all sorts of things can either get in the way or just our own financial situation can inhibit us from doing so. For some of us its circumstances, tragedies or whatever, that make it very untenable. I know when I was younger and had to worry too much about paying the bills and it really would affect my work and with a family I needed to be more secure in selling my  paintings on a regular basis so I was very tuned in to what kind of subject I was doing and the pricing so that I could be fairly sure that it would sell. This was mostly back in the 1980s and 1990s when the Art Market was more robust and when more collectors were exposed to Art in our school system. Things like the internet were not around and the world was not so small. I was also mostly involved in the “Western Art Market” and it was quite robust with three-legged horse paintings and drooling cows even selling in some of the Galleries and Auctions. I knew that if I turned out an exceptional work of art, it would usually sell within a couple of months.

I was fortunate enough to get a scholarship at one of the best Art schools in the country, The Art Center School of Design in Los Angeles. I was an Illustration major and got some really great training as all of the instructors were working professionals and really maintained the very high standards that it would take to survive in a very competitive career. One of my favorite illustration classes was with a teacher that gave us some restrictive limitations in some of our assignments. We would be given an odd size as 9″ x 20″ and would have subject limitations such as we could only see half of a car, two-thirds of a tree, a house, etc. It made us think differently as to being inside of the car looking out, up in the tree or inside of the house or on top of it. Well more exciting things came out of those kinds of assignments than those in which we had unlimited choices. As they say: “necessity is the mother of invention”. It was quite a revelation for me and I often remember that lesson. I always felt that as “Artists”, that was kind of our job… “to see things differently and to present it to the world”. Unfortunately, all of the Art world and buying public and even educated buyers are not necessarily in tuned or so enamored with what we consider “a great invention” or a “unique” point of view! Art is very subjective and that creates some very positive and negative situations for us all.  That seems to be the kicker in so much of how one survives to make a living in the Art World. There are a few that are so talented, ingenious and skilled, but most of us fall in the middle range somewhere and really have to diligently work at our craft and figure what will work best just for us.     

I want to expound on this “Unique” thing as I think it is something we all would like to do more of, but the reality for most of us is it doesn’t always translate into sales as idealistically we would like it to. I have been a member of the “Northwest Rendezvous Artists” for some years and it has some of the best artists from all over the country and each year the 30 to 35 members would vote on our five favorite paintings. We all knew each other fairly well and had some idea when a member really came through with an exceptional work of art and so we would vote accordingly. I think most artists are a fairly good judge of a good or great painting, and I believe even more so if they are pretty darn good artists themselves. So anyways, each year the top five were chosen and invariably most of the time those paintings did not sell. That is a heartbreaker to see and I just tell this tale as what one would think, those works of Art would be cherished for, but not the reality of it. I have seen it happen in other shows. I have been fortunate to have been invited to some really fine exhibitions where some of the artists were really pushing the envelope and doing some creative work making me feel like my own was looking rather mundane! It at least got me inspired to think about what I could do if I could at all! To try and put a little more “interest” in my own work.

The main point here is that one must WANT to do that in one’s own work, certainly not necessary. So what if one is selling most of their so-called “mundane” work, isn’t that all quite good anyways? When expressing my disenchantment to other artist friends I would get various responses from “you are doing great..just keep fine-tuning what you do” or “sure, why not, try and do some different things”. All of it would get muddled with, should I change my style, get more sophisticated ideas, and how does one do that? Different subject matter? Jeez..I was already doing some of that, probably not the “sophisticated” so much; and I was also doing the work in different mediums! Many of us struggle with most or at least some of these things in growing as an artist. The main thing is we have to be somewhat true to ourselves and even that can present a problem to those of us who are more insecure about our own work. I kind of ended up compromising, I have mainly been fine-tuning my style, and looking for more unique compositions or viewpoints and different subjects. But still in the back of my mind I sometimes think, is there a hidden, wild abstract expressionist being repressed, that pure inner child? I kind of doubt it! 

I have included some of my paintings, that..and the important point..for me was doing something unique, at least unique for me!  I should mention that often I have gotten some big awards with them and usually because they were somewhat different from the general run of the mill entries.  

“Crested Butte Autumn” by Ned Mueller OPAM

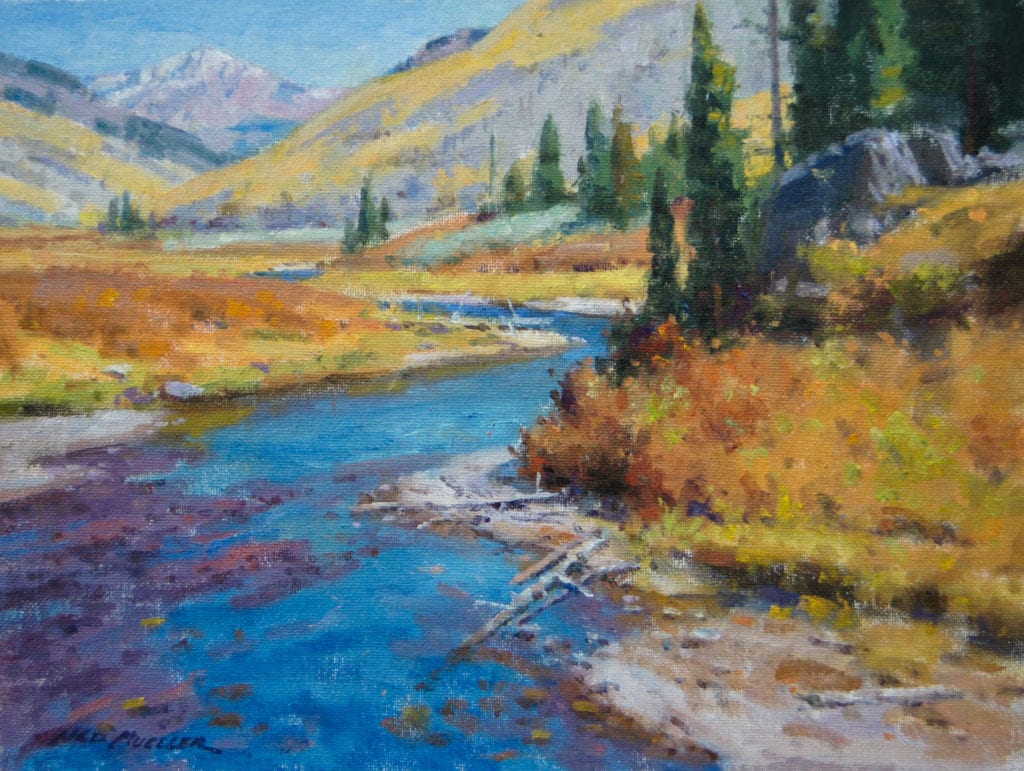
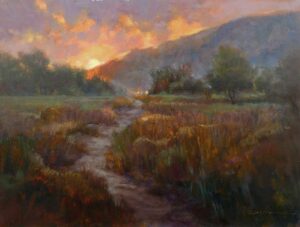
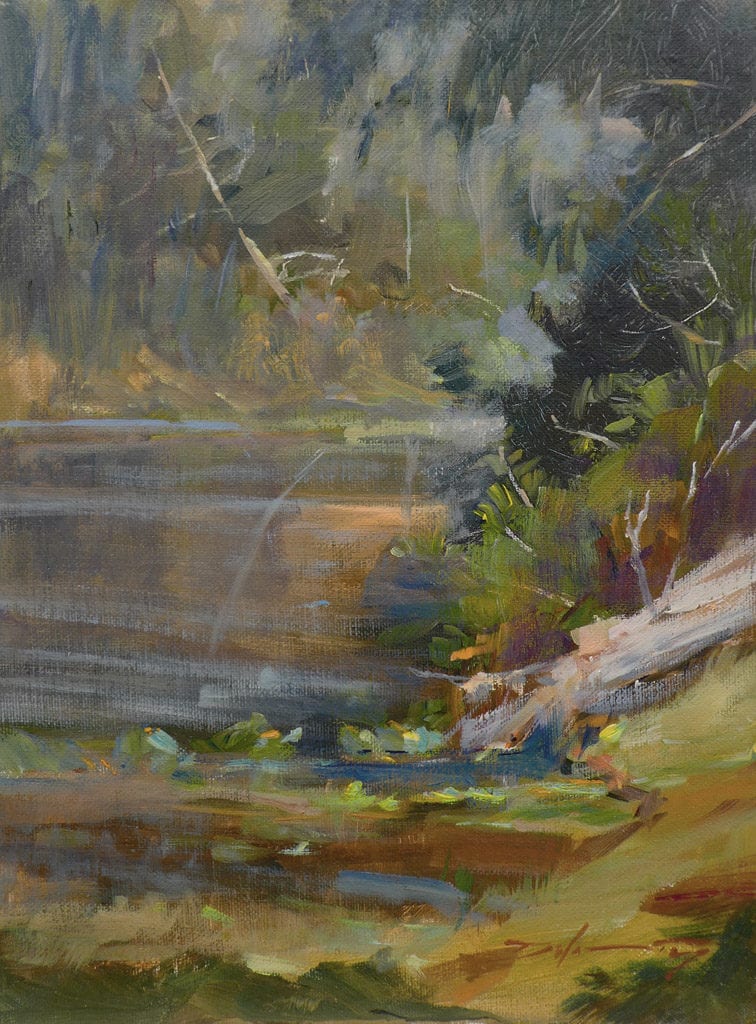
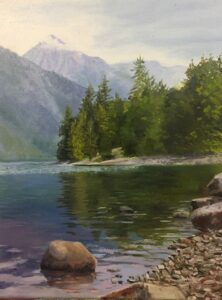
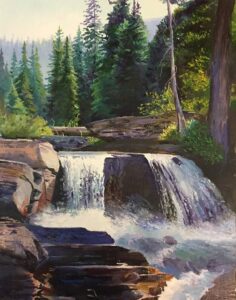
This first image is an example of a subject and composition that I generally do, a typical mountain stream, pine trees, and some rocks. At least an interesting arrangement of shapes and colors but nothing very “unique”.     

“Beartooth Spring” by Ned Mueller OPAM

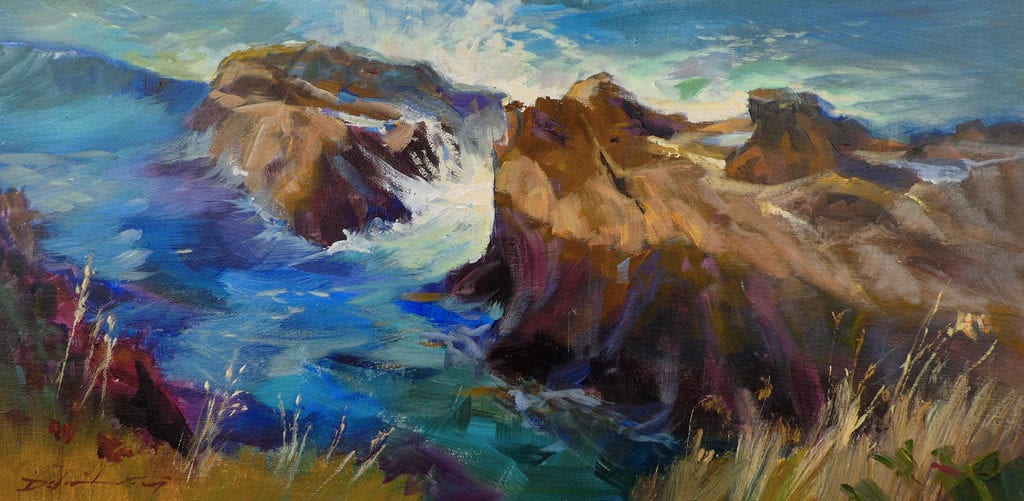
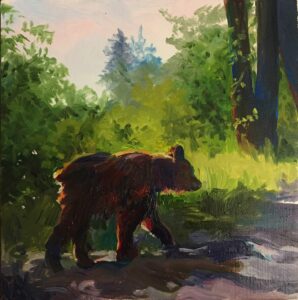
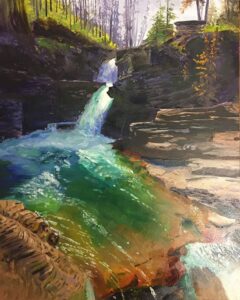
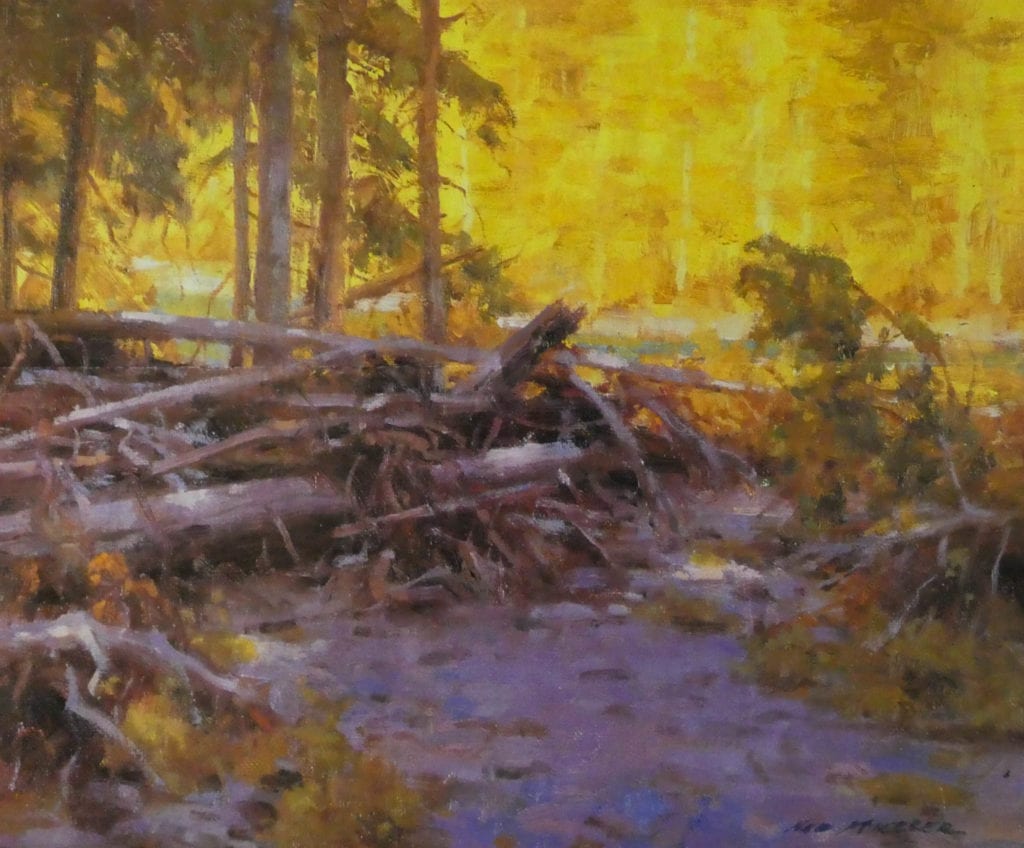
Getting a little better. This image is a landscape of a mountain setting but with more emphasis on the “abstract” arrangement of rocks and snowfield. 

“Flower Market-Guatemala” by Ned Mueller OPAM

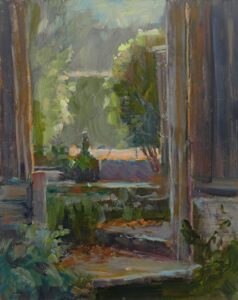
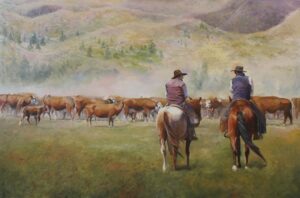
A little different, nothing that hasn’t been done before, just lined up figures on the far side of the picture frame, but not having to have everything happening within the picture frame. In a way, the single flower on the steps on the right..helps balance everything.     

“Coffee Break” by Ned Mueller OPAM

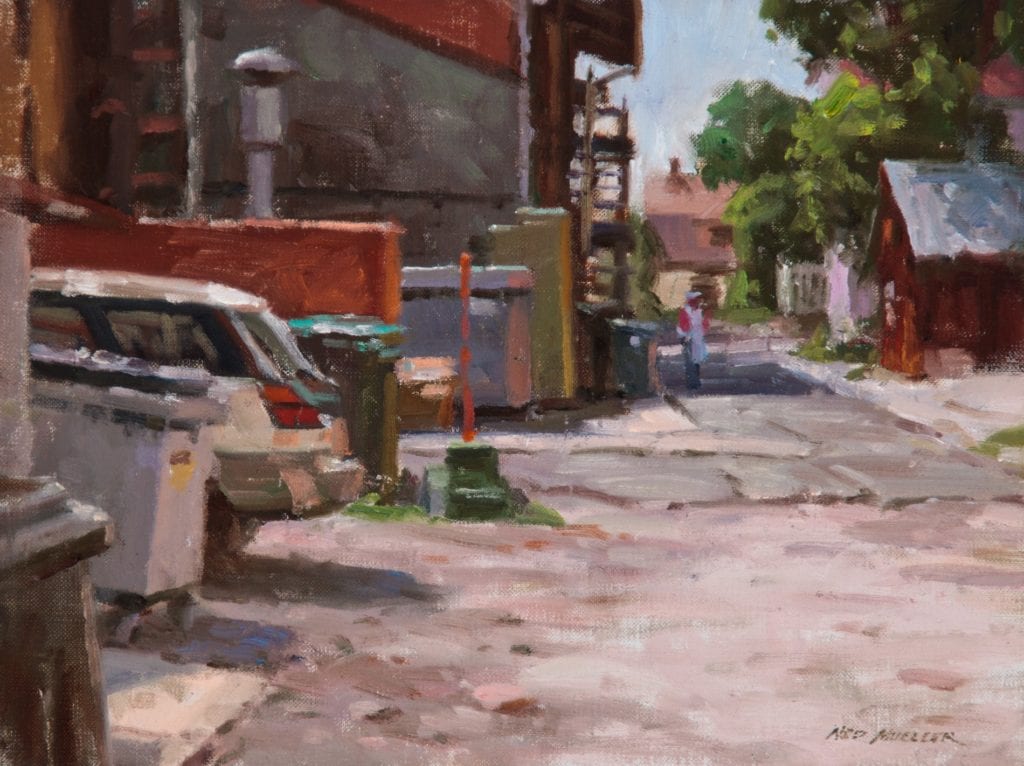
Now I’m getting somewhere, at least subject wise. This was a plein air painting I did in a plein air event in Telluride, Colorado (did not sell it and still have it) but I entered it in the “Outdoor Painters Society” show and it got “Best of Show”…$5000!  As I tell my students “a good painting is an interesting arrangement of shapes, colors, and edges- regardless of the subject”, and it could apply to abstracts also! The judge saw it as that, even though it is a back alley of garbage cans, dumpsters, broken pavement, and the rear end of a car!     

“All Tied Up” by Ned Mueller OPAM

This image was from a plein air event in Annapolis a few years back. As I am in the habit of looking for something unique, I had just finished a rather mundane painting and walked onto this scene. An old oyster shack with some junk laying around and this odd machine that had a bright green tarp wrapped around it. As soon as I saw it, I knew that I would get a good painting out of it. I was really fascinated and excited and enough of an edge of doubt that I thought it came out darn good. Fairly well-executed and unique and it got second place in the show! I later sold it to another artist!     

“Plein Air Artists-Ireland” by Ned Mueller OPAM

I wanted to include this image and add a side note if I may as it has an interesting story and history behind its execution.  The “Quick Draw” has always been a big crowd pleaser and it originated with a group of artists that I have been affiliated with, “The Northwest Rendezvous Group”, where we use to have our annual exhibitions in Montana. I was not a member at the time, but we would have a campout and paintout the week before the exhibition, somewhere nice in Montana. The first few years the campout was in the Madison Valley, just Northwest of Yellowstone Park.

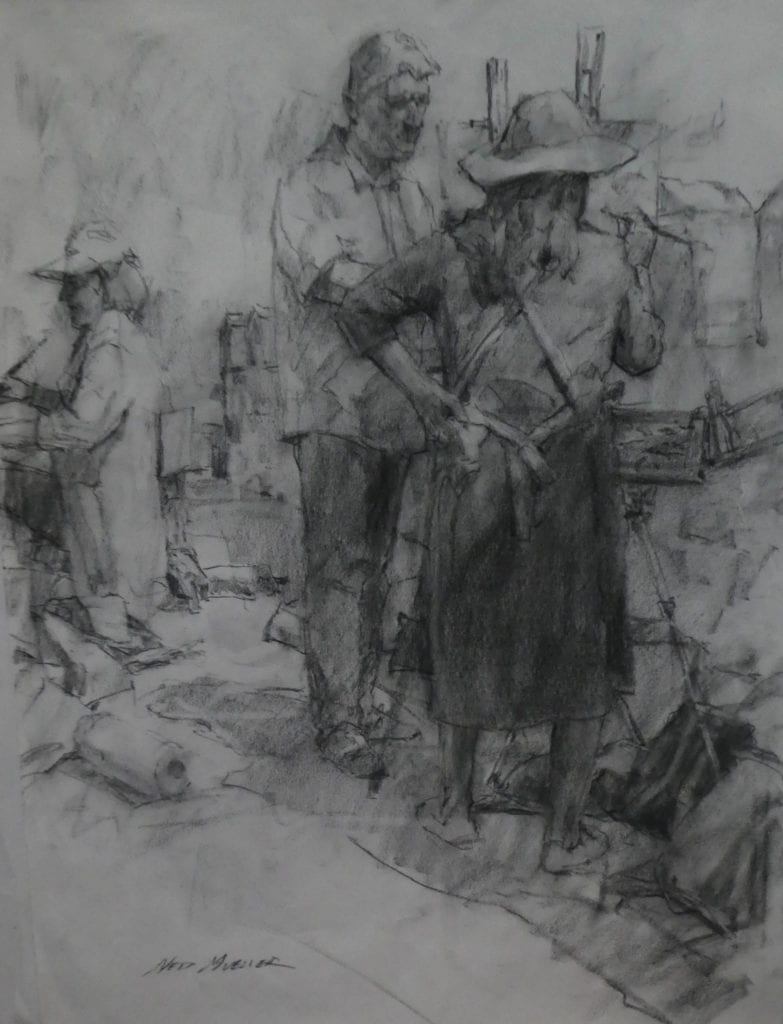
We would invite models to the campout, including Mountain Men, Indians, Cowboys, with their horses, Tipis and such. A wonderful gathering of artists and subject matter suited for one of the top Western Shows. Artist, Robert Morgan (May he rest in peace) had the ingenious idea to invite the collectors to the campout and watch the artists create a drawing within 30 minutes and then auction off the work. It was mostly to let the artists show off their drawing skills and so that the artists literally have enough money for gas to get home!! Well, the quick draw has changed in so many ways now, mostly all painting and for much longer periods of time. In fact, the Rendezvous show has recently given us artists up to 5 hours to do a work and those who do not paint from life could bring in a painting two-thirds done and finish them off at the Quick Draw. Anyways, I have done a lot of quick draws over the years and everyone does them in paint, including me. Well for some reason I thought, wouldn’t it be nice and “Unique” to go back to the original intent. After all it is called a “Quick DRAW” and so I did a drawing of the other Plein Air artists. In fact, I had so much time, I did three drawings, and lo and behold I got First Place and could have sold the drawing three or four times! Very grateful that we had a judge that understood the importance and uniqueness of a drawing! Just this last summer, I did a drawing for the Quick Draw in the largest Plein Air Event in the world in Wexford, Ireland and got a second-place award.

This drawing shown, of Some Plein Air artists I also did at this last summers “Art in the Open” in Wexford and got picked as the “Best Drawing” in last month’s Plein Air Salon. I am mentioning these awards I have gotten to emphasize that often the judges are looking for something different. I have juried a lot of shows and one sees a lot of the same paintings, same subjects over and over again and so most judges are looking for something, not just well done, but also has that “Uniqueness” that so many of us are looking for. I realize so much of this has been about my experiences but I am familiar with the circumstances and the motivation behind them and at least hope that you might be able to use it to spark that part of you that calls out for trying to be a bit different… certainly at least different for us and whatever form that may be. 

A few last words… I think a lot of this idea of being “Unique” can radiate from trusting our own instincts. Those thoughts and impulses that come from our deeper selves. We need to trust and listen to them as they often are things that seem right at the time and only for us and our “unique” vision. Beginners usually have to concentrate so much on developing their skills, they just don’t have the inclination to consider their instincts, but with growing skill confidence those instincts can be more trusted and more readily paid attention to. I would love to hear some of your comments, both agreeable and not so, and anything in between! Thanks for lasting this far, I hope that you enjoyed this blog and best of luck to you in your endeavors!

I have a Facebook group where I have demonstrations and videos of my processes including portraits, figures, studio, and plein air landscapes along with explanations of demos and references I use and why and how I put them together. I have been teaching for over 50 years and painting for 75 years and so have a lot of experience, knowledge and some wisdom to share. I am also a “Designated Master” with both the Oil Painters of America and the American Impressionist Society and I love to share my process with others. You can go to this link:  Ned’s Artist Buddies or go to my website at www.nedmueller.com and click on works and then Artist Buddies. It is a very good deal! 

Is Plein Air Painting A Sport?

Rick Delanty · Nov 18, 2019 · 1 Comment

“Along the Trail, Mendocino” by Rick J. Delanty
12″ x 24″ – Acrylic

–all images here have been painted or begun en plein air–

When Bob retired after 42 years in the aerospace industry, one of his buddies whose wife was an artist suggested that he take up plein air painting. “I know you don’t like sailing, tennis, or shuffleboard, Bob,” he advised, “but you could paint outdoors—I’ve heard it referred to as the new golf. You can learn it in your spare time—I’m sure if you had the right gear, you could do it.”

Across the nation, there is a revival of and renewed interest in plein air painting. Folks whose kids have moved out of the house, who downsized and moved across the country, and have finally decided to act on those creative impulses that inspired them in college are taking art classes, making reservations at the Plein Air Convention, and buying art supplies. Motivation is high, as are hopes and expectation of some degree of success. Painting could be a fun pastime!

“Sunset Over Home” by Rick J. Delanty
18″ x 24″ – Oil

I’ve heard this myself, both from artists and art aficionados, that plein air is like a sport, like the “new golf.” But like anything, how much one can learn about anything is conditioned by one’s motivation and mindset. If it is a sport, one would approach it as “an activity involving physical exertion and skill in which an individual or a team competes against another or others for entertainment” (Oxford Dictionary). Football, basketball, baseball, tennis, wrestling, volleyball and golf are all widely recognized as sports. But does plein air painting fit into this list?

“Deep Blue Montage” by Rick J. Delanty
12″ x 16″ – Oil

I love to paint, and I love sports. I have had the privilege to complete 65 marathons, several long-distance ocean swims, ran cross-country and track in high school and college, competed as a triathlete between ’78 and ’94, and twice crossed the finish line of the Hawaiian International Ironman Triathlon. In recalling all of that fortunate time I spent outdoors, and during my current daily workouts,  I have rarely called upon my artistic abilities when competing athletically (except for an elevated awareness of my response to the immediate environment), or my athletic training while painting (except for hiking with my plein air kit to remote locations, or running to scout new painting sites)– but I believe there are some crossovers between athletics and artistic creation.

Similarities

It’s helpful to have the right equipment, as that in itself will assist successful achievement. Extensive training in both is essential to performing well. And coaches and mentors can shortcut the learning curve and inspire progress. One may participate in both sport and painting as a student, amateur or professional, and that participation may result in significant income (or not). Instinct, self-trust and confidence play key roles in a successful performance. Sports and painting both require hand-eye coordination and superior depth perception. The true quality of an athletic performance is best understood by a fellow athlete, just as an artist best understands the work of a fellow artist. Finally, the goal of both the athlete and artist is to continually improve one’s skill set.

“Flying, Coastal Canyon”  by Rick J. Delanty
16″ x 20″ – Oil

Differences

In plein air painting, there is no finish line, no “final minutes,” no game buzzer (except in an organized “Quick Draw” event). Risk of injury is less (but it is still real). Judges and jurors never wear striped costumes while performing their duties. There is no governing body of rules that constrain painting sessions– but there are fundamentals to be observed nonetheless (as in sport). Few plein air painters find themselves in a position to buy a mansion for their mother, and agents representing professional plein air artists are next to non-existent. Quiet time for reflection and self-evaluation during painting is essential, whereas in sport the action is moment-to-moment, demanding the athlete’s constant and physically-intense involvement. And at plein air events, there’s no betting on the outcome—it wouldn’t change the result anyway, one way or the other. And here is perhaps the greatest difference of all: think of how an athlete tries to control all the factors in a game as he/she does everything in their power to succeed, to win. Contrast that with Dean Taylor Drewyer’s observation about painting: “The best paintings, it seems to me, are the ones in which the painter suspends any drive to control or order the world, and commits to simply struggling to grab hold of a small part of the chaos.”

Painting is None of The Following. Leigh Steinberg (sports agent): “One of the keys to building the popularity of a sporting event is the extent to which fans perceive the activity has athletic qualities which are displayed on an even field with competitors trying as hard as they can to win. This is the key to fantasy leagues and all athletic betting.”

Painting can be competitive, but it never has to be engaged in that spirit, even in plein air “competitions.” It’s entirely possible to enter those contests without the slightest desire to fend off or overcome an opponent, as one concentrates on giving one’s very best to the creation of their own art, regardless of the circumstance. In fact, most of the professional painters I know participate in these events with a heart open to their fellow painters and are just as satisfied to see awards given to their comrades-in-art.

“Fallen Log, Morris Graves” 
by Rick J. Delanty
12″ x 9″ – Acrylic

So if plein air painting is not a sport, what is a more effective way of considering it as we seek to learn more about it, to maximize both our performance and enjoyment?

No Rules, Quang Ho: “For me, there is no one way of painting…It’s about gathering as much information and ability as possible and then allowing myself to follow visual impulses and ideas, allowing each one to tell me how they might be coaxed out of the canvas.”

Goals Without Goalposts, Larry Preston: “I paint for myself and the process, not anyone else…I paint to remind myself of what I find important and beautiful and to experience the process of painting my chosen object. Success, for me, is found in the studio—in the drive to continue growing as an artist and create honest work.”

A Fight With No Opponent, Winston Churchill: “Painting a picture is like trying to fight a battle.”

Courage, But Without  Threat of Physical Engagement, Charles Philip Brooks: “Painting requires the bravery of solitude. Painting requires disciplined labor. To be a painter is to search the world with a benevolent eye for every subtle beauty the infinite world offers.”

A Lifestyle, Not A Pastime, Betty DeMaree: “To me, painting is life, a part of God, something sacred and uplifting. If I as a painter were denied my tools and my expression, I think I would become ill.”

Like Poetry, James Elkins: “Painting is a fine art: not merely because it gives us trees and faces and lovely things to see, but because paint is a finely-tuned antenna, reacting to every  un-noticed movement of the painter’s hand, fixing the faintest shadow of a thought in color and texture.”

Like Music, Brian Eno: “At the beginning of the 20th century, the ambition of the great painters was to make paintings that were like music, which was then considered as the noblest art.”

“Garden Gate” by Rick J. Delanty
12″ x 9″ – Acrylic

Everybody Wins

 I would suggest that in plein air painting, there is no “winning”—in the sense of domination– only the satisfaction of having connected with nature in an honest and appreciative way. Primarily, plein air painting should be enjoyable. It can be, for the beginning painter as well as the advanced and professional. As master pastelist Kim Lordier advises, “Paint what you love.” Love is the answer, above winning, awards, and world records. Plein air painting is an expression of love; for one’s self, the process, one’s capacity to learn, for our surroundings, for all those with whom it may be shared. Plein air painting has no “rules of the game,” but it does have its own vocabulary: the language of the spirit.

Taking Care of the Artist: Improved Awareness and Self-Care – Focus on Hands and Wrists

Teresa Boynton · Nov 11, 2019 · 2 Comments

After a session of painting in the studio or en plein air, do you find yourself questioning why your back, neck, shoulder, elbow, wrist or hand are uncomfortable or painful? Does the pain last for more than an hour?  Does it interfere with sleeping or other activities?

My husband, Bruce, resumed oil painting shortly after retiring over 5 years ago.  Earlier this year, he attended a wonderful plein air workshop in France by Jane Hunt (workshopsinfrance.com) and I went along as a non-painting spouse. (I’m an occupational therapist/OT with an ergonomics and injury prevention specialty, and many years’ experience in an outpatient rehab clinic treating a wide-variety of work-related, as well as non-work-related, injuries and illnesses.)  During the course of the workshop, I was able to assist an artist who was experiencing significant neck, shoulder and upper back symptoms that were impacting her ability to participate.  Kinesiotaping, use of an ice pack and targeted gentle stretching helped to decrease muscle tightness.  This, along with discussing set-up and easel/canvas orientation along with awareness of neck and upper back posture, and positioning of shoulders helped to keep symptoms under control. Further discussion included points to cover with her physical therapist and doctor when she returned home.

As a result of this experience, I was asked to write a post for the OPA blog.   This is the first post with a focus on fingers, thumbs, hands and wrists.  (Future posts will address the elbow, shoulder, neck, upper back and visual system.)  The intent of this post and information is not to override or interfere with diagnosis and treatment recommended by your physician, occupational or physical therapist or other healthcare provider nor to keep you from seeking medical attention if needed.  The intent is to increase awareness regarding posture, how we position and use our upper extremities, and how this can impact comfort and symptoms.  Very basic anatomy and physiology will be covered, along with stretches focused on specific parts, and basic modalities (cold and hot packs) and treatment options (kinesiotaping, splinting).   

During the course of my career, it became apparent that:

  • Many people lack awareness regarding their posture and how awkward working postures and positioning can lead to pain and a variety of symptoms, including muscle tightness and imbalance, trigger points, numbness and/or tingling, and pain.  People tend to forget to “check-in” with themselves when immersed in a project, and they will unknowingly maintain an uncomfortable posture or position for an extended period of time.  Injuries, illnesses and/or syndromes can develop as a result of an acute episode or cumulative trauma, and underlying medical conditions can worsen (e.g., carpal tunnel syndrome, cubital tunnel syndrome, Guyon canal syndrome, osteoarthritis, rheumatoid arthritis, lateral or medial epicondylitis, tendinitis). Even when a posture or position is neutral and balanced, it shouldn’t be sustained for a prolonged period of time; i.e., we need to move and stretch even when our basic working posture or position is good.  Regular, frequent movement and stretching becomes critical when our posture or position is less than neutral and balanced – less than ideal.  
  • The visual system, the eyes, are the “boss.”  They will dictate posture and position. For example, if the eyes can’t see comfortably and clearly when working on the upper portion of a canvas, they will “demand” that you tip your head back with your neck in extension so they can gaze more downward with the eyelid covering more of the eyeball.  This downward gaze used for close work leads to more frequent blinking, which helps to lubricate the eyes, which makes the eyes “happy;” i.e., the eyes are comfortable but at the expense of the neck, shoulders and upper back.  This type of awkward rounded upper back and shoulders, with head forward and tipped back posture is seen when a computer monitor or canvas on easel is positioned too high for comfortable viewing, especially when the computer worker or painter wears progressive, bifocal or trifocal lens glasses.   In addition to neck and upper back pain, this type of posture can lead to symptoms in the upper extremities, such as those found with “Thoracic Outlet Syndromes” (TOS). 

The quick take-away is to set up your easel and canvas so that you can maintain a good balanced working posture but don’t forget to check the visual system and make sure your eyes will allow you to maintain this good posture.  I’ve seen people set up and before they begin working, overall their standing posture is good with their head well-balanced over their shoulders, chin and neck in a neutral position; however, as soon as they start painting, their head tips back and their chin juts forward and up (neck in an extended position) as their back and shoulders round because their eyes demand comfort and ease of viewing when focused on the upper portion of the canvas.

I will cover trigger points, neck, shoulders and upper back, TOS, and the visual system in more detail in future posts. 

Today’s post is focused on hands and wrists.

From Examination of the Hand and Wrist (Tubiana, R., Thomine, J., and Mackin, E.; 1996):

“The hand is remarkably mobile and malleable.  It is capable of conforming to the shape of objects to be grasped or studied, and of emphasizing an idea being expressed.  These possibilities and varieties of function are realized through the unique structure of this organ, which consists of 19 bones, 17 articulations, and 19 muscles situated entirely within the hand, and about the same number of tendons activated by the forearm muscles.”

“The functional architecture of the hand offers this organ multiple possibilities of adaptation, exploration, expression, and prehension. The hand joins, in the same anatomical structure, the powers of knowledge and action. It is both the origin of very precise information and the irreplaceable executor of the wishes of the brain.  The hand is the privileged messenger of thought.”

For a good, basic review of hand and wrist anatomy and physiology, I recommend “The Anatomy Coloring Book” by W. Kapit and L.M. Elson (Pearson Education, Inc.).  This book covers  skeletal and articular systems, including wrist and hand bones and joints; the skeletal muscular system, including intrinsic movers of the hand joints; the peripheral nervous system, including the brachial plexus and nerves to the upper limb (anterior division: musculocutaneous, median and ulnar nerves; posterior division: axillary and radial nerves).

Checking-In with Yourself:

The following stretches (and other similar stretches) can be a good way to “check-in” with yourself, as well as being used as part of a treatment plan.  

As an occupational therapist, after completing a thorough evaluation, I instructed clients in specific stretches and exercises depending on their condition and diagnosis (as well as assessing their activities of daily living and determining their work and activity recovery goals). 

These stretches and exercises were focused on improving range of motion by lengthening muscles and tendons and helping to “lubricate” joints, and typically on strengthening and decreasing discomfort and pain while addressing swelling or edema if that was an issue. When joints were inflamed or too painful, stretching and exercises were adjusted or discontinued (for the time-being) and the focus was on using modalities and other treatments to address inflammation and pain.  With appropriate stretching and range of motion exercises as part of a self-care program, most clients were able to return to previous activities and meet most or all of their goals.

Frequently this was done in conjunction with making adjustments to their work stations and work tasks to make them more ergonomically sound.  

For an oil painter, work station or work task adjustments may include:

  • Remembering not to hold the brush any tighter than necessary (i.e., don’t use the “grip-of-death” when applying paint); consider using a brush with a larger or smaller handle.
  • Adjusting your stance, as well as your elbow and shoulder position to avoid deviating your wrist and forearm into an uncomfortable position.
  • Adjusting your easel so your canvas is lower to avoid tipping your head back when viewing and applying paint to the upper portion of the canvas.
  • If you sit while painting, you may need to raise your chair and use a footrest.  You would do this to avoid hunching forward while jutting your chin and head out.  The footrest would assist with keeping your feet from dangling (i.e., feet dangling can lead to low back discomfort).
  • Painting in a remote location with a less than an ideal set-up to allow for a good working posture; consequently, taking more stretch breaks focused on realigning posture, especially your neck and upper back position, and decreasing the risk of muscle tightness and trigger points.  
  • Considering other activities that may be contributing to symptoms, such as extensive mouse use and clicking, opening tight lids on jars and tubes, grasping and carrying heavy items, gardening tasks, and determining how these can be modified so they create less stress for finger joints, hands and wrists.

Before beginning any of the following stretch exercises, please review these general guidelines and precautions.

General Guidelines and Precautions for Stretch Exercises:

  1. If you have current restrictions regarding stretches or exercises from your physician or other healthcare provider, continue to follow these restrictions. If you have been instructed by your healthcare provider to avoid or limit any of the activities mentioned in this post, continue to follow these restrictions until you talk to your healthcare provider and are given clearance to proceed.
  2. Work within your level and range of comfort.  Move at a pace and within a range of motion that is comfortable for you.   Be careful not to over-stretch delicate finger and hand joints.
  3. If a stretch or exercise causes pain, either stop the movement entirely, or try the stretch/exercise using smaller or slower movements. You may also need to decrease the number of repetitions you perform of a particular stretch.
  4. Initially stretches may only be held for 3-5 seconds with a gradual increase over a period of weeks to 10-20 seconds, or up to 45-60 seconds for larger muscle groups.  After stretching, release slowly avoiding sudden releases. Initially, you may also only perform 1 or 2 repetitions (especially for smaller joints) before increasing to 10 – 15 repetitions for 1 to 3 sets.
  5. Rapid high force stretches can lead to injuries.  Perform stretches slowly without jerking or bouncing.  Move into a stretched position smoothly and gradually.  Continue to the point where you feel a mild tension, then relax as you hold the stretch. 
  6. Use a natural breathing pattern.  Don’t hold your breath while stretching.
  7. Develop Body Awareness! Promote and Maintain Range of Motion and Strength!  Prevent Injuries!  Feel More Relaxed!

Hand Stretches:

1. Whole Hand Finger Flexion/Extension Tendon Glides:

  • Starting with knuckles/joints furthest from the palm, slowly make a fist
    • Bend or flex the DIPs (Distal Interphalangeal joints) then the PIPs (Proximal Interphalangeal joints) until your fingers are curled into a fist
    • Wrap your thumb around/across your fist
  • Relax, then straighten your fingers and thumb out and spread them apart
  • Pull the fingers and thumb back together
  • Repeat for 1 to 5 repetitions

2. Active Individual DIP (Distal Interphalangeal joint) Flexion/Extension

  • Using the fingers of the opposite hand, hold/pinch or block the middle knuckle (the PIP) to prevent it from bending
  • Bend or flex the end knuckle (the DIP) as far as you can then straighten
  • Repeat for 2 to 10 repetitions

This is an exercise I perform regularly when the osteoarthritis (Herberden’s node) in my right index finger DIP joint “acts up” after working on the computer keyboard and mouse clicking for too long.

3. Individual Finger Flexion Tendon Glides

  • With the elbow bent (about 90 degrees) and kept close to the trunk, palm up and wrist straight, use the opposite hand to hold or block all but one finger (e.g., to start with the middle finger, block/hold the index, ring and little fingers in place) 
  • Bend or flex the PIP through the MP (Metacarpophalangeal joint) as you bring the tip of the finger towards the palm
  • Repeat for 2 to 10 repetitions; start slowly and only perform 1 or 2 repetitions if this is uncomfortable
  • Complete with all fingers (e.g., middle finger, then index finger, then ring finger, then little finger; the order you use isn’t important)

If it is more difficult or painful to perform with one or more fingers, focus on these fingers throughout the day.  For example, if you notice more stretching/pulling and discomfort when using the middle finger, complete one or two repetitions; then about 30 minutes later, complete another one or two repetitions with the middle finger only; repeat this as needed.  If the flexor tendons and muscles for the middle finger are responding, it will become easier and you will be able to complete more repetitions by the end of the day.  If, on the other hand, discomfort and other symptoms (e.g., numbness and tingling in your hand and pain in your forearm) are increasing, stop and consider the need to see a hand specialist and a referral for occupational or physical therapy. 

Due to the architecture of the hand, the tips of the middle and ring fingers can typically bend much closer to the palm than the tips of the index or little fingers.  This is normal.  Don’t force fingers to bend/flex more than they comfortably can.  Also, don’t be surprised if you notice pulling and discomfort in your forearm.  This is where the flexor compartment muscle bellies are located. 

I frequently recommended individual finger flexion and tendon glides for the index, middle and ring fingers, along with the “Carpal Tunnel Decompression Exercises” (covered next), wearing an appropriate wrist brace when sleeping and use of cold pack applications to assist clients who were diagnosed with carpal tunnel syndrome (CTS).  This treatment proved beneficial both pre- and post-carpal tunnel decompression surgery, as well as for clients who chose not to have the surgery or those who needed to postpone surgery.   It also helped to rule-out possible underlying causes of CTS; e.g., a body of research indicates that CTS is not caused by computer keyboarding and mouse use; however, CTS is associated with pinching and forceful gripping, as well as extreme wrist positions, especially if pinching, gripping and extreme wrist positions are prolonged or repetitive.  There is also a genetic and gender component.

4. Carpal Tunnel Decompression Exercises – Median Nerve Stretching

  • Hold each position for up to a count of 10
  • Move from one position to the next in a slow, controlled, fluid manner.
  1. Start by standing with your arms, wrists and hands relaxed at your side
  2. Lift your right arm out in front of you to about shoulder level (or slightly below) with your elbow straight (in an extended position) and the palm of your right hand facing up.  Bend your wrist back (into wrist extension) with your fingers spread slightly and the fingertips pointing towards the floor and hold for up to a count of 10.
  3. While continuing to keep your elbow straight, bring your wrist up into a flexed position as you make a tight fist with your fingers and thumb and (again) hold for up to a count of 10 (i.e., your elbow is straight and your thumb and fist are trying to reach towards your face).
  4. Next, bend or flex your elbow while bringing your fist towards your right shoulder and keeping your wrist in a flexed position and tight fist; hold for up to 10 counts.
  5. While keeping it at shoulder level (or slightly below), rotate your arm out to your side; maintain your flexed elbow, flexed wrist and tight fist; then rotate your neck and turn your head so you are facing your fist (i.e., your nose is close to the back of your hand and knuckles); hold for a count of 10.
  6. Straighten your elbow and release your fist (straighten your fingers) and bend your wrist into the extended position with fingers again pointing towards the floor, then slowly rotate your neck and turn your head toward your left (opposite) shoulder; hold for up to 10 counts.  (Note: This position puts the median nerve, which runs through the carpal tunnel, on a maximum stretch. It’s not unusual for people performing this step to initially only be able to tolerate it for a very short time – only for a count of 5 or 6.  As they perform this series regularly, people typically find they can tolerate it for a count of 10 and their arm feels relaxed and re-invigorated afterwards.)

End by lowering your arm, turning your head forward, relaxing and gently shaking your hands.  Repeat with your left arm. It’s also good to compare your right to your left; i.e., Is one side tighter? Do you experience numbness and tingling in one hand when you perform #6?

This series of movements was developed in 1996 by Dr. Houshang Seradge, an orthopedic surgery and hand specialist in Oklahoma City, OK.  Dr. Seradge recommends performing a complete series consisting of 13 steps once before and once after your workday. He recommends performing Steps 1 through 6 (described above) during breaks.  I started using this series shortly after I got an illustrated copy of them in 1996. I like them not only because of the benefit to the carpal tunnel and median nerve but because of the stretch and relief to the extensor and flexor compartments of the forearm (including the ulnar and radial nerves).  I worked with many people who didn’t have CTS but they did have very tight forearms, and this series was particularly helpful.  (In addition to other exercises and work station adjustments, this series was effective for people who had computer “Mouse-Shoulder syndrome.”)  As previously listed, follow general guideline and precautions for stretching.

These are just some of the hand and wrist stretches that can benefit oil painters.  Nerve glides (which I don’t cover in this post) can also be very beneficial.  The key is finding a good variety of stretches and nerve glides that you find beneficial and performing them regularly.  Check-in with Yourself!

Modalities:

In the rehab clinic, a variety of modalities are used such as ultrasound, electrical stimulation, phonophoresis, iontophoresis, TENS (transcutaneous electrical nerve stimulation), mechanical and manual traction, fluidotherapy, paraffin, moist heat packs, ice packs and contrast therapy (alternating between heat and cold).  

Cold Packs, Hot Packs and Contrast Therapy:

 I’m going to focus on cold packs, and contrast therapy, since these can easily be used at home as part of a self-care program as they don’t require any special equipment.

Benefits of Cold Therapy:

Cold or ice therapy is used to reduce blood flow (by narrowing blood vessels), reduce inflammation and pain signals. When used in conjunction with active range of motion exercises and stretching, cold therapy can help to decrease swelling (edema).  It’s typically used during the acute or early phase of healing but may also be used as part of an ongoing treatment plan for more chronic conditions. 

NOTE: Care must be taken to avoid cold packs that are too cold or are applied for too long as this can cause skin damage including severe burns.  People with compromised skin, neurological and other conditions, should always consult their physician before using any modality. (For example, cold packs are not used with people diagnosed with Raynaud’s syndrome.) 

Purchased gel cold packs can be kept in your refrigerator for use as needed or you can use a bag of frozen peas; both conform well.  You can also make your own cold pack using one-part isopropyl rubbing alcohol combined with two-parts water (e.g., ¼ cup rubbing alcohol mixed with ½ cup water); place this solution in a zip-lock bag.  Depending on the type and brand of bag you use, I recommend double bagging; i.e., place the sealed bag with the solution inside another zip-lock bag and seal this second bag. Put the double-bagged solution into your freezer, and you’ll end up with a cold slush that also conforms well.  Typically for hands and wrists, and depending on cold tolerance, a cold pack is applied to the painful area for 15 – 20 minutes maximum.  (After about 20 minutes, the cold pack has reacted to body heat and is no longer as cold or effective as it originally was.)  A washcloth or other thin material can be placed between the cold pack and the skin.  On applying, the typical phases when using a cold pack are: 1) feels really cold, 2) when you check under the cold pack, the skin appears mottled, 3) you experience a warming sensation, 4) then the area feels numb.  Shortly after removing the cold pack, there is usually a flushing or re-bound reaction when the blood vessels re-open and blood flow resumes at its normal level.  The skin should no longer look mottled, and you should say, “That feels better.  I’m glad I used that cold pack.”  (If you applied a cold pack properly, you should not see skin pallor, which indicates a circulation issue, or a dry patchy/rashy-looking spot, which could indicate a skin burn. Nor should you experience an increase in muscle tension and spasms, which may indicate that you shouldn’t use cold packs for this condition.)

I instructed clients to monitor their pain and swelling after applying cold packs.  While initially skeptical, many determined that cold packs worked better for them than hot packs, and cold packs became their treatment of choice. 

Benefits of Heat/Hot Therapy:

Both heat and cold have their uses in treating an injury.  Heat therapy works in the opposite manner compared to cold therapy. Heat expands the blood vessels, which increases circulation.  While this can relieve cramping, help with tight, aching muscles and decrease discomfort, it can also make inflammation worse.

Contrast Therapy – Alternating between Cold and Hot Therapy:

While both cold and heat can be beneficial, sometimes it’s difficult to decide which is best and sometimes one alone may not provide as much relief as alternating between the two, known as contrast therapy.   Contrast therapy can reduce swelling and inflammation, improve circulation, decrease muscle tension, and ultimately reduce pain.

A typical ratio for contrast therapy is 1 minute of cold (using a cold pack) for every 3 to 4 minutes of heat (using a hot pack) repeated about 3 times. A basic pattern for applying contrast therapy is: begin with 1 minute of cold, apply 3 minutes of heat, apply 1 minute of cold, apply 3 minutes of heat, apply 1 minute of cold, apply 3 minutes of heat, and finish with 1 minute of cold.

The guidelines I gave clients at the rehab clinic varied slightly from this ratio:

  1. Prepare two pans or sinks of water (deep enough to be able to submerge hands and wrists)
    • One pan/sink with water 105-110 degrees (comfortably warm but not hot)
    • One pan/sink with water 59-68 degrees (cold)
  2. Immerse your hand(s) and wrist(s) in the warm water for 10 minutes
  3. Immerse your hand(s) and wrist(s) in the cold water for 1 minute
  4. Immerse your hand(s) and wrist(s) in the warm water for about 5 minutes
  5. Immerse your hand(s) and wrist(s) in the cold water for 1 minute
  6. Repeat 4 and 5 two times, then end in warm water for about 4 minutes or end with 1 minute of cold if you need to focus on reducing inflammation and swelling.

Clients could use conforming cold and hot packs if they preferred.  Whether using packs or immersing in water, they were instructed to monitor their response and adjust accordingly.

Kinesio® Tape Technique:

Kinesiotaping is a rehabilitative taping technique developed by Dr. Kenzo Kase.  I found it very beneficial for providing support and stability to muscles and joints without restricting range of motion, and for decreasing edema.  Kinesiotaping along with other treatments, such as strengthening exercises and cold therapy, helped clients to meet their pain-reduction and rehab goals. 

Below are photos of several taping patterns for hands and wrists.  Where you anchor the tape and the amount of stretch applied through the tape is important.  Since it is flexible and latex-free, most people tolerate kinesiotaping well and can wear the tape for days at-a-time.  However, in my experience, due to hand use and washing, kinesiotape applied to fingers, thumbs, hands and wrists only stays on for a day at the most, and then needs to be re-applied.

  • Index Finger Extensors
  • Thumb Carpometacarpal (CMC) joint
  • Wrist Carpal Tunnel (CT)

You can find more information on kinesiotaping by going to https://kinesiotaping.com or by talking to an occupational or physical therapist or other healthcare provider who is trained in kinesiotaping.   There are also a number of reasonable YouTube videos.

Braces/Splints:

The last item I’m briefly mentioning is the use of braces or splints.  A brace or splint can be beneficial if it fits well and provides the support required without rubbing (i.e., creating red spots).  It can be problematic if it doesn’t fit well or you “fight” against it or you don’t perform stretches and exercises to maintain range of motion and strength on a regular basis in conjunction with wearing the brace or splint.

I like the Comfort Cool™ brand of braces because they are breathable, well-designed with good adjustability, and a good range of sizes.  The Comfort Cool™ Thumb CMC Restriction Splint works well for people with thumb issues, and the longer Comfort Cool™ Thumb and Wrist Splint are good for people who need thumb support as well as maintain a neutral wrist position and/or need additional wrist support (e.g., people with lateral epicondylitis that is exacerbated by wrist extension).  Comfort Cool™ splints are readily available through web sites.  Similar braces and splints can also be found in pharmacies.

In Conclusion:

I’ll cover the elbow, shoulder, neck, upper back and visual system in future posts.

Remember to check-in and take good care of your fingers, thumbs, hands and wrists!

Enjoy a life-time of creativity and oil painting!

Falling In Love

Dan Knepper · Nov 4, 2019 · Leave a Comment

“Transcendence, My Toes Are Cold” by Dan Knepper
40″ x 30″ – Oil

FALLING IN LOVE lets you see the world through rose-colored glasses.  Your energy level rises. You’re a more positive person. It often brings new experiences and your world expands. You are renewed, revived, energized and enthusiastic. 

What more could an artist ask for? It’s exactly what we need: New destinations and experiences to push our work to new levels… to see the world a little more brightly, to be positive, and energized!

Last summer I fell in love with Montana. Head over heels. It’s not hard to do.  Every blink and turn of the head finds new reference material. 

We, (my mom, grown son, and I,) spent a few days in Glacier National Park.  I was dumbstruck by the color and clarity of the water, the breathtaking views, the wildlife. At one point we stopped the car knowing the car in front of us must be looking at something special.

I was so excited trying to get my mom and son to look at the bear walking straight toward our car that I stuttered, “b-b-b BEAR!” This beautiful cinnamon bear passed right under my open car window and I could have petted him as he went by.  Photographs pale in comparison to memory. You have to capture those memories on canvas.

“b-b-b Bear!” by Dan Knepper
6″ x 6″ – Oil

There was a deer right behind me as I took the reference photo for this:

“McDonald Lake” by Dan Knepper
12″ x 16″ – Oil

There are waterfalls; great, soaring, sparkling falls among gorgeous conifers and deciduous trees.  The cascades, tumbling over multi-colored rocks, beg to be painted, and you can’t wait to oblige.

“Mom Left the Tub Running Again” by Dan Knepper
14″ x 11″ – Oil
“St. Mary Falls” by Dan Knepper
11″ x 14″ – Oil
“There’s Gotta Be a Moose Here Somewhere”
by Dan Knepper
18″ x 12″ – Oil
“Palaver” by Dan Knepper
26″ x 36″ – Oil

Montana still has cowboys. REAL cowboys!

And how can an artist not be reinvigorated by the wildlife of the National Bison Range? This giant followed the car a bit until we allowed him to pass and cross right in front of us. 

“0 to 30 in 3 Steps” by Dan Knepper
12″ x 16″ – Oil

We saw grizzlies with cubs, elk, pronghorn, … at one point I had been dangling my feet in McDonald creek and got up to take a photo. When I turned back a beaver was swimming right where my feet had been, in water so clear you could see every detail of the bottom.

Are you frustrated? Are you feeling artistically uninspired? Do you need to be recharged? FALL IN LOVE.

Find Dan’s Montana inspired work in the Going to the Sun Gallery, Whitefish, MT, and the Howard/Mandville Gallery, Woodinville, WA. To see more of Dan’s work and representation, visit DanKnepperArt.com

“Listen” by Dan Knepper
11″ x 14″ – Oil

Footer

  • Home
  • About
    • Mission, Policies & Bylaws
    • Board of Directors
    • Presidential History
    • Frequently Asked Questions
    • History
    • OPA Staff
    • Contact Us
  • Membership Services
    • Member Login
    • Membership Information
    • State & Province Distribution For Regionals
    • Update Member Information
    • Membership Directory
    • Contact Membership Department
  • Events
    • Exhibitions
    • Online Showcase
    • Lunch and Learn
    • Virtual Museum Road Trip
    • Paint Outs
  • Resources
    • Brushstrokes Newsletters
    • Ship and Insure Info
    • Lunch & Learn Video Archives
    • Museum Road Trip Video Archives
  • Services
    • Sponsorship Opportunities
    • Scholarships
    • Critique Services
    • Workshops
    • Have A HeART Humanitarian Award
  • Online Store
  • Awardees
  • Blog
    • OPA Guest Bloggers
    • Blogger’s Agreement (PDF)
    • Comment Policy
    • Advertisement Opportunities

© 2025 OPA - Oil Painters of America · Design by Steck Insights Web Design Logo